Understanding the Advanced Template Editor
NEW: Watch the short How-To video series, including Import Your Template >
The Swiftpage emarketing
Advanced Template Editor is a tool for customers with a working
knowledge of HTML design. It is a WYSISYG editor that can modify the HTML
visually or by editing the raw HTML code.
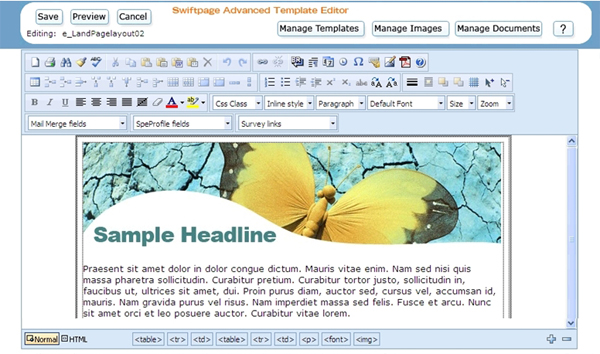
When you enter the Swiftpage emarketing
Advanced Template Editor, you will see your
template in the middle, with buttons and toolbar above and below it:
The buttons at the top perform the following functions:
Save: saves the template in its current form. Note: you must save or cancel a template before you can edit another template.
Preview: allows you to preview how the template will look when sent.
Cancel: cancels any changes you have made in the current editing session and returns you to the Template Manager screen. Note: you must save or cancel a template before you can edit another template.
Manage Templates: returns to the Swiftpage emarketing Template Manager screen.
Manage Images: takes you to the Swiftpage emarketing Image Library, where you can upload, store or delete images to be used in future templates.
Manage Documents: takes you to the Swiftpage emarketing Document Library, where you can upload, store or delete PDF documents to be used in future templates.
The buttons at the bottom perform the following functions:
![]()
Normal/HTML: these buttons allow you to switch between a normal view with images and formatted text, or pure HTML that you can edit. Note: editing HTML is only recommended for advanced users.
HTML tags (<table>, <tr>, <td>, <table>, <tr>, <td>, <p>, <font>, <img>): these allow you to adjust various factors of the window selected, including font color, background color, table properties like inserting or deleting rows, and so on.
Plus and Minus signs on the right allow you to enlarge or reduce the size of the viewable editing window (zoom).
The toolbar at the top of the screen performs the following functions, where each number represents a button moving from left to right:

First row:
New: erases any content you have and starts you afresh with a blank template. – NOTE – ONLY ADVANCED HTML DESIGNERS SHOULD USE THIS!
Print: allows you to print your template.
Find and replace: find text in your template and replace it with different text.
Clean up HTML: allows you to perform various functions to your HTML to make it cleaner, including removing tags and improving code from Microsoft Word.
Spell check: run the spell checker.
Cut: removes text and copies it to be pasted elsewhere.
Copy: copies text that can then be pasted elsewhere.
Paste: pastes copied or cut text.
Paste as Plain Text: pastes copied or cut text as plain text, with no formatting.
Paste from Microsoft Word: pastes text copied from Word, and cleans up the HTML to work within Swiftpage emarketing ’s editor.
Paste as HTML: pastes copied text into the HTML, so it becomes code, not text.
Delete: deletes the selected text, image, or window.
Undo: this button undoes the last action taken.
Redo: this button redoes the last action taken.
Insert/edit hyperlink: allows you to link text to a web address, or edit the link.
Remove hyperlink: takes away the link from the selected text.
Break: inserts a one-line break in the text.
Insert paragraph: inserts a full paragraph break in the text.
Insert date: automatically inserts today’s date.
Insert time: automatically inserts the current time (from your computer’s clock).
Insert special character: displays a menu of special characters that can be inserted, including letters with most diacritical marks.
Universal keyboard: allows you to choose from keys on a universal keyboard, choosing from various nationalities’ characters.
Insert image: insert an image from your Image Library or upload a new image, and access the Image Editor if needed.
Insert PDF document: insert a document from your Image Library or upload a new document.
Help button: accesses Swiftpage emarketing support.
Second row:
Insert table: begins a new table where the cursor is.
Insert row above: puts a new row in your table above the current row.
Insert row below: puts a new row in your table below the current row.
Delete row: removes the selected row from your table.
Insert column (left): puts a new column in your table left of the current column.
Insert column (right): puts a new column in your table right of the current column.
Delete column: removes the selected column from your table.
Insert cells: inserts a cell to the right of the selected cell.
Delete cells: removes the selected cell from your table.
Row properties: opens a menu to define the properties of the selected row(s), including dimensions, formatting, and so on.
Cell properties: opens a menu to define the properties of the selected cell(s), including dimension, formatting, and so on.
Merge cells right: merges the selected cell(s) with the cell to the right.
Merge cells down: merges the selected cell(s) with the cell below.
Split cells right: splits the selected cell(s) and creates a new cell to the right.
Split cells down: splits the selected cell(s) and creates a new cell below.
Insert numbered list: begins (or continues) a numbered list.
Insert bulleted list: begins (or continues) a bulleted list.
Indent text: moves the selected text’s margin to the right, i.e. makes it indented.
Unindent text: moves the selected text’s margin to the left.
Superscript: makes the selected text into superscript (smaller text slightly above).
Subscript: makes the selected text into subscript (smaller text slightly below).
Strikethrough: puts a line through the selected text.
Upper case text: puts the selected text into all capital letters
Lower case text: puts the selected text into all lower case letters.
Horizontal line: inserts a horizontal line below where the cursor has been placed.
Position absolutely: allows you to position an image or other item absolutely, so it will remain in the same position regardless of text or other items around it.
Bring forward: brings the selected item or image to the front of other elements (e.g. in front of text).
Send back: puts the selected item or image behind other elements (e.g. behind text).
Removes the dotted lines you see when viewing your template (see more about the dotted lines below, under #5).
Select all: this button selects all text, images and other items in your template.
Select none: this button unselects anything in your template that has been selected.
Third row:
Bold: makes the selected text bold (or normal, if already bold).
Italic: makes the selected text italic (or normal, if already italicized).
Underline: makes the selected text underlines (or normal, if already underlined).
Align left: aligns the selected text with left margin.
Align center: aligns the selected text to the center, between margins.
Align right: aligns the selected text with the right margin.
Align justified: aligns the selected text with both the left and right margins.
No alignment: removes all alignment, so that the selected text will be aligned based on the defaults of your recipients’ email program.
Remove format: removes all formatting from the selected text.
Font color: changes the font color to the selected color (the arrow allows you to choose the color from a menu).
Highlight color: changes the color behind the text to the selected color (the arrow allows you to choose the color from a menu).
CSS class: allows you to define a cascading style sheet, if applicable.
Inline style: allows you to choose from a variety of preset styles.
Text style: allows you to choose from a variety of text styles.
Font: allows you to choose the font you desire.
Font size: allows you to choose the size of the font.
Zoom: allows you to view your template larger or smaller (zoom in or out).
Fourth row:
Mail merge fields: inserts a Swiftpage emarketing mail merge field, including both standard fields and fields from your own database.
Profile fields: inserts a mail merge field to be populated from your Swiftpage emarketing Profile (set up in the “Your User Profile” section of My Swiftpage emarketing .
Survey links: inserts a link to any of your Swiftpage emarketing surveys.
Other tips on editing your template in Swiftpage emarketing ’s Advanced Template Editor:
When you click in your template, you will see dotted lines appear, which represent the windows and table lines of your template. You can put your mouse on the sides of those dotted lines and adjust their width and height. These dotted lines will not appear in your template when sent.
You can move text or images around in your template by merely dragging and dropping them.