Swiftpage emarketing
Drip Marketing Help
In this help document you will learn about the following:
- Drip Marketing Campaign Manager
- Drip Marketing Stage Manager
- Getting started with a Drip Marketing Campaign
- Copy a Drip Marketing Campaign
- Drip Marketing Stages
- Drip Marketing Reports
- Drip Marketing Preferences
- Drip Marketing List Viewer
Drip Marketing Campaign Manager
The Drip Marketing Campaign Manager provides an overview of all the Drip Marketing Campaigns you have created. You can Launch, View, Suspend, Edit, and Delete your Campaigns. You may also view the uploaded contact list and Reports.

Drip Marketing Campaign Status:
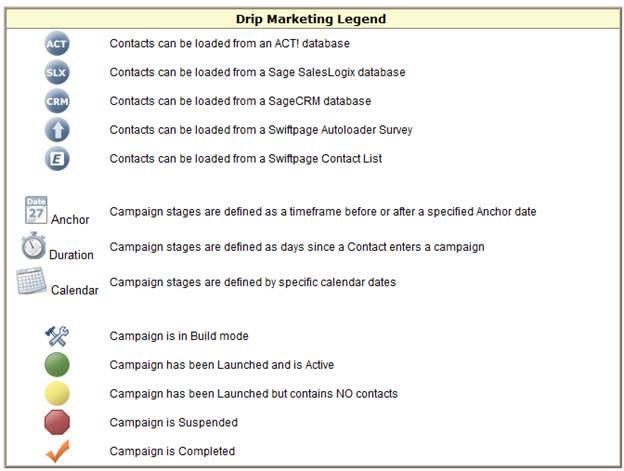
Drip Marketing Campaigns have the following statuses:
Build – The hammer and chisel icon on the Drip Marketing Campaign Manager denotes that the Campaign is currently in Build. Build means that the stages in a Campaign are being edited. New Campaigns start with this Status, and remain so until they are Launched. Contacts cannot be added to a Campaign that is in Build status.
Active – The Active Status can be identified by the green circle icon on the Drip Marketing Campaign Manager. A successfully Launched Campaign is Active and remains Active until it is Suspended or Complete. A Campaign must be Active for its stages to execute.
No Contacts Active – This Status is represented by a yellow circle icon. The Campaign has been successfully Launched but it does not contain any contacts. The Status will automatically change to Active once contacts have been uploaded to the Campaign.
Suspended – The Suspended Status occurs when a Drip Marketing Campaign has been manually or automatically Suspended. The stages of a Suspended Campaign do not execute. Suspended Campaigns can be identified by the red octagon icon on the Drip Marketing Campaign Manager.
Complete – A Campaign is marked as Complete once all of its stages have been executed. This Status is represented by an orange check mark.
Drip Marketing Campaign Stage Manager
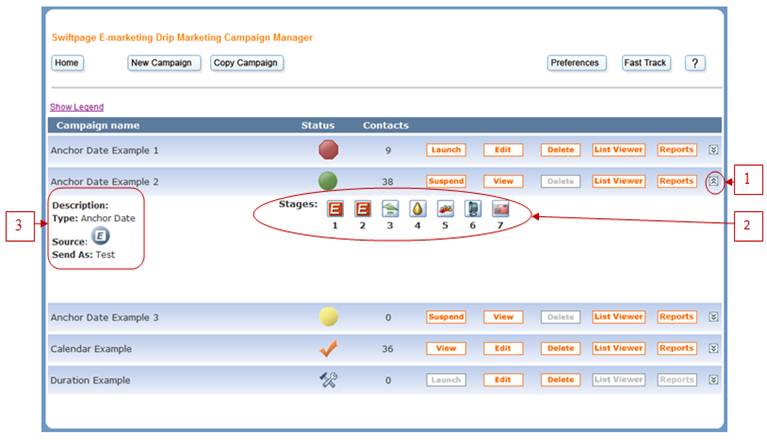
- Dynamic arrow – Clicking the dynamic arrow shows or hides details about a specific Drip Marketing Campaign.
- Stages - This displays the number, type, and sequence of stages in the Drip Marketing Campaign.
Description – Details the Campaign Type, Source, and Send As UserID.
Getting started with a Drip Marketing Campaign
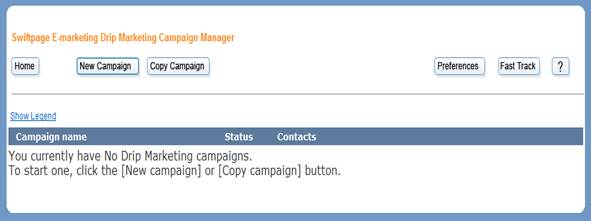
To get started with Swiftpage emarketing
Drip Marketing you will need to select either New Campaign or Copy Campaign. When you click on New Campaign, you will see the below screen and the following three options: Anchor Date, Calendar, or Duration.
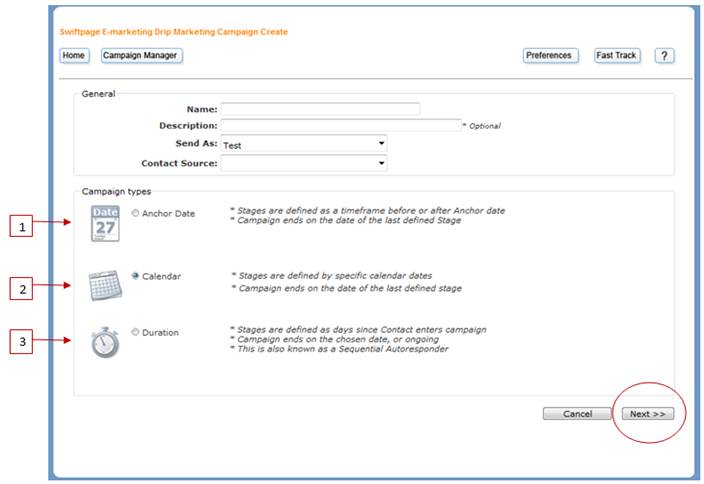
1) The Anchor Campaign type allows stages to be setup based on a date before or after a certain Anchor Date (such as an event). All of the stages are added in relation to the specified date as days, weeks, or months before or after. This Campaign type ends on the date of the last specified stage.
2) The Calendar Campaign type allows stages to execute on specific calendar dates. This Campaign type ends on the date of the last specified stage.
3) The Duration Campaign type allows stages to be created based on the days since a contact has entered the Campaign. This Campaign type may either be ongoing or end on a specified date.
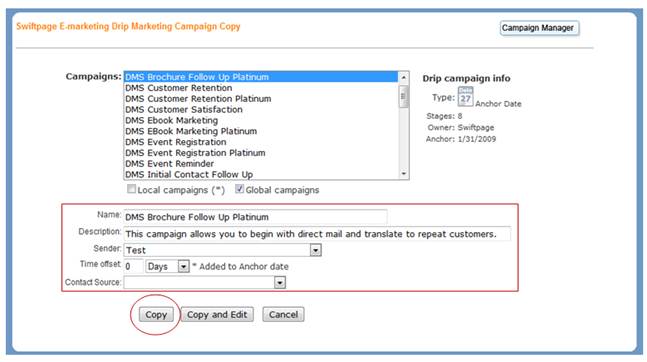
To Copy a Global Drip Marketing Campaign or one that you have previously built, click the Copy Campaign button on the Drip Marketing Campaign Manager. To copy a Campaign you have created, you will want to check the Local campaigns checkbox. Now, select the Campaign that you would like to Copy and enter a name and description. Select the Swiftpage emarketing
Send As UserID, offset the Campaign dates, select a contact loading source, and then click Copy.
The Swiftpage emarketing
Drip Marketing level you have purchased determines which Drip stage types you are able to utilize. We offer nine stage types: Email, Call List, Postcard, Letter, Fax, Telemarketing, Export, Transfer, and Review.
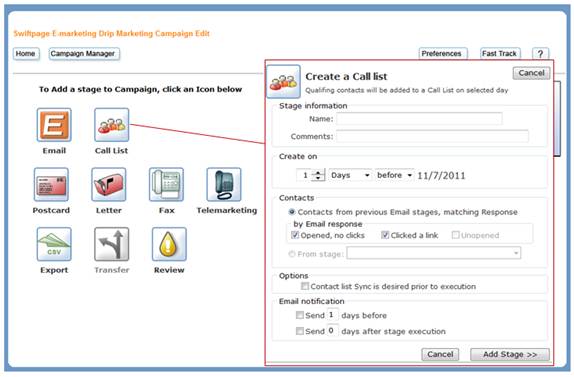
To create a stage in your Campaign, click on the icon of the stage type you would like to add. Then you will need to customize that stage by adding information such as a name, date, contacts to include, and any email notifications wanted before or after the Campaign is sent out. After this is done, click on Add Stage>> to create a stage.
Stage Details
Email- Sends an email to a specified group of contacts.
Call List- Automatically creates a Swiftpage emarketing
Call List. A Call List is a group of contacts that are ranked based on their interaction with an email blast.
Postcard- Sends a list of contacts to a third party print company.
Letter- Sends a list of contacts to a third party print company.
Fax- Sends a list of contacts to a third party fax Company.
Telemarketing- Sends a CSV file of contacts to a third party call center to call your contacts on your behalf.
Export- Creates a list of qualifying contacts in a .CSV formatand automatically emails it to you.
Transfer- Automatically moves qualified contacts to another Drip Marketing Campaign.
Review- Sends an email notification to you on a selected date. ITalso allows you to specify a date to sync your contacts’ data with your database and, if desired, to automatically suspend your Campaign.
Creating and Editing Drip Marketing Campaigns
The Drip Marketing Campaign editor is described below. The editor can be accessed from the Drip Marketing Campaign Manager by clicking the Edit button. If your Drip Marketing Campaign is Active, it must be Suspended before editing can begin.
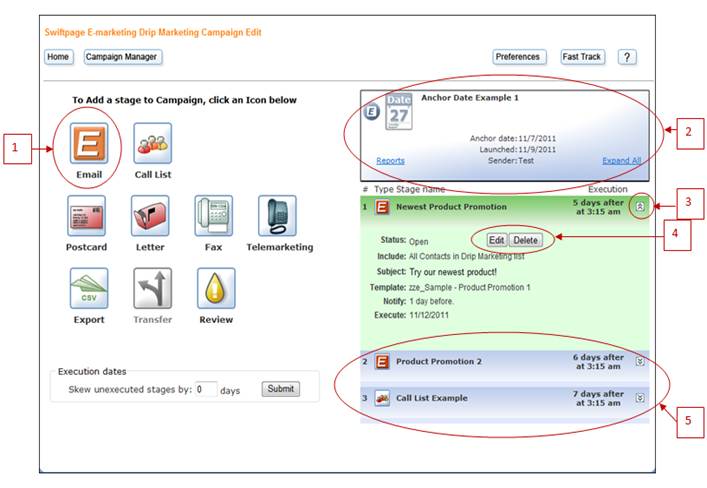
1) Drip Marketing Stage Creation – Click one of these icons to create a new Drip Marketing stage. A Drip Marketing Campaignis comprised of one or more stages. Stage availability and functionality is determined by the Drip Marketing Service Level you have purchased.
2) Campaign Information – Shows details regarding the Drip Marketing Campaign that is currently being edited.
3) Dynamic arrow – Clicking the dynamic arrow shows or hides details about a specific Drip Marketing stage.
4) Edit and Delete buttons – Clicking the Edit button opens the stage for editing. All parts of the stage can be changed at any time before the stage executes. Clicking the Delete button deletes that stage.
5) Viewing Stages – After Drip Marketing stages are created, they are listed on the right hand side of the Edit screen. From left to right, the Stage Number, Stage Type, Stage Name and Execution date are shown for each stage.
Creating and Editing Drip Marketing Stages
The Drip Marketing Stage Editor can be accessed from the Drip Marketing Campaign Manager by clicking the Edit button. If your Drip Marketing Campaign is Active, it must be Suspended before editing can begin.
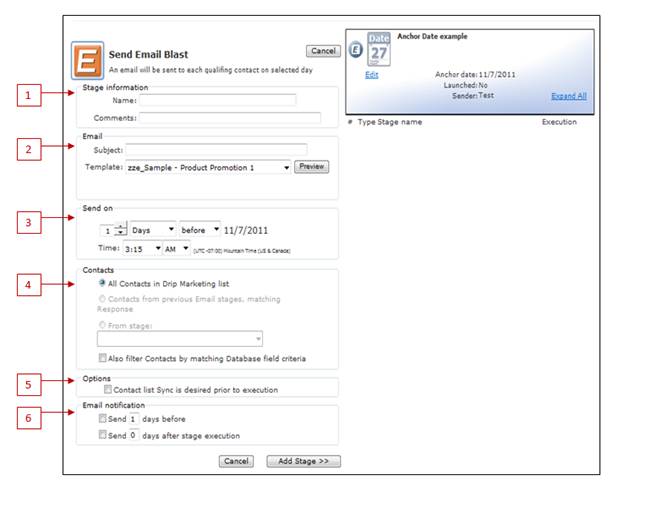
1) Stage Information – Each stage requires a Stage Name. The Stage Name is used for internal purposes only. You will be able to identify stages in the Editor, Viewer, and Reports based on the Stage Name. The Comments field is optional.
2) Email – For the Email stage type, the Email section provides details about the email you will be sending. You will need to enter a Subject, select an email Template, and enter an associated Personal Message if the selected Template contains a Personal Message Mail Merge field. This category is unique to each stage type. If you are creating a Call List stage, for example, this section will provide a Call List Name.
3) Send On – For the Email stage type, the Send On section allows you to select the date and time your email blast will be sent. This category is unique to each stage type. If you are creating a Call List stage, for example, this section will allow you to select a date and time to create a Call List.
4) Contacts – The contacts section allows you to select which contacts you would like to affect (For example: send an email to, create a call list of, export or whatever your stage type is).Options here include:
i. All Contacts in Drip Marketing List–affects all contacts in your list.
ii. Contacts from previous Email stages, matching Response –affects contacts that Opened, clicked, did not open, or a combination of each from all previous Email stages.
iii. From stage –affects contacts who opened, clicked, did not open, or a combination of each from a particular Email stage or Call List. (*Note: if a Call List stage is selected, contacts can qualify based on Call List Actions.)
5) Options – Selecting the Contact list Sync is desired prior to execution checkbox sets a reminder to sync your contact data with this Drip Marketing Campaign. This reminder can be seen on the Drip Marketing Campaign Manager, and in the database plug-in you are using (ACT!, SalesLogix or Sage CRM).
6) Email Notification – Email notifications can be sent prior to stage execution, after stage execution, or both. Enter the date you would like the notification to be sent on, the email address, subject and body.
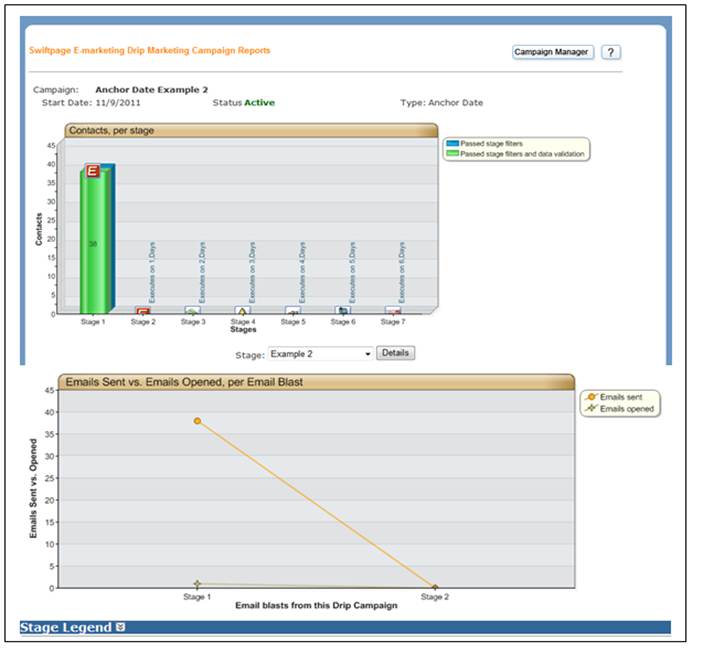
To view Drip Marketing Reports, click the Reports button on the Campaign you would like to view.
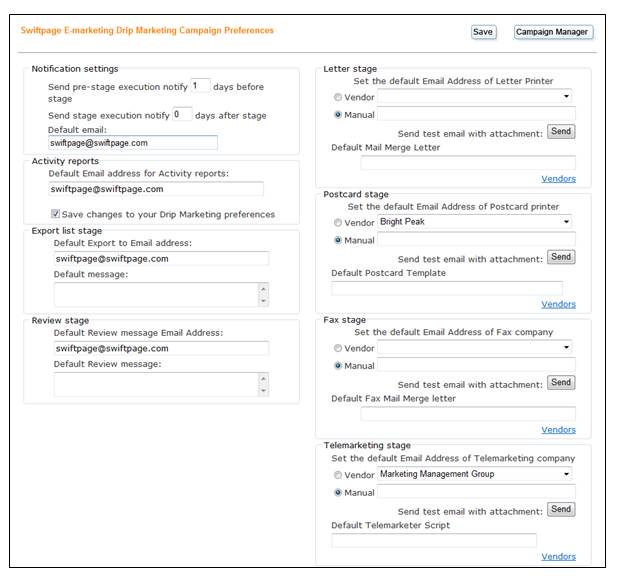
Drip Marketing Preferences allows you to set preferences for the features you use most often. Preferences are accessible from the Drip Marketing Campaign Manager. Here you can set preferences for: Notification Settings, Export list stage, Alert stage, Letter stage, Postcard stage, Fax stage and "Telemarketing stage". If these preferences are set, they will appear as default settings while creating the appropriate stages within a Drip Marketing Campaign.
Press the Save button to save changes.
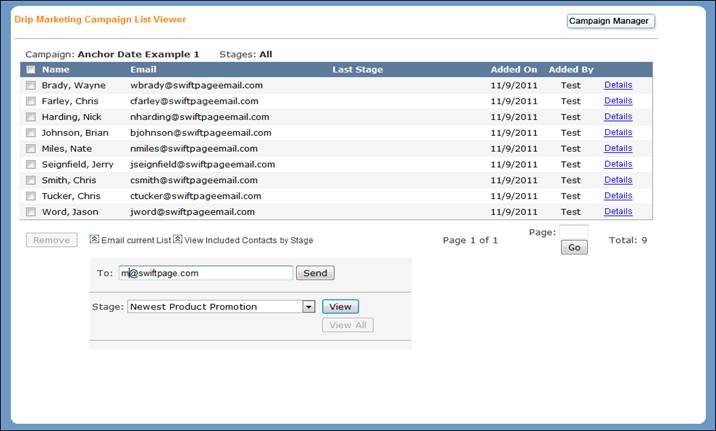
The Drip Marketing List Viewer allows you to view different lists within your Drip Marketing Campaign . Use the List Viewer to:
1) View all contacts in the Drip Marketing Campaign
2) View the contacts in each stage that has executed
3) View the last stage that has executed with a particular contact in it
4) Forecast the contacts that will be in a stage that has not yet executed
5) Email any of the above lists to a specified email address.
Sync Contacts with the List Manager
The following section will detail how to use a List Manager Group to update your Drip Marketing Campaign’s Contact List.
- From the E-marketing Portal, click List Manager.
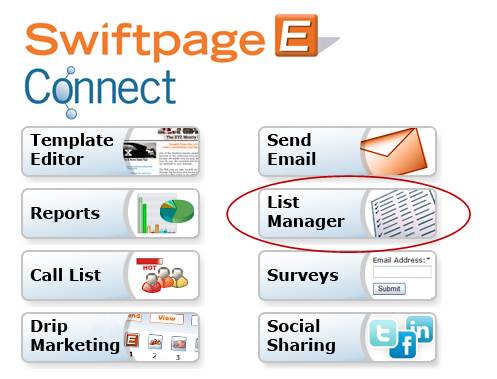
- Click Update Drip Marketing.
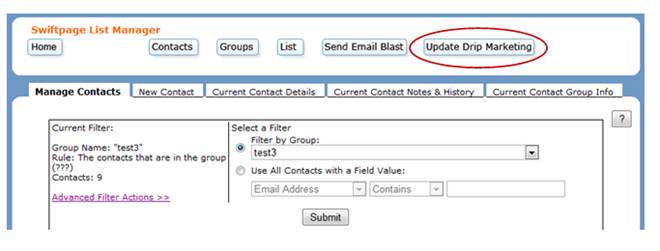
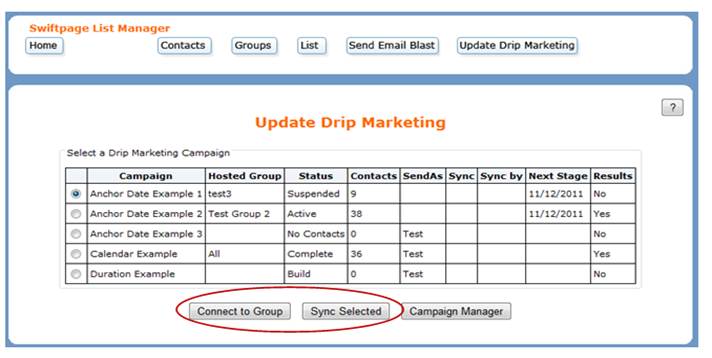
- Select Connect to Group or Sync Selected.
- After selecting a Group, click Connect.
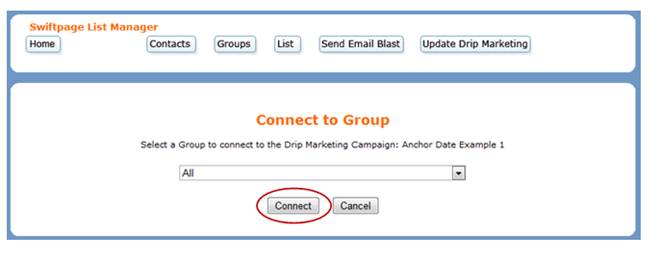
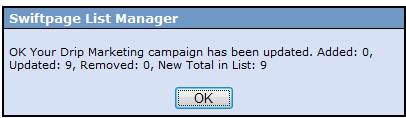
- Click Finish Sync.
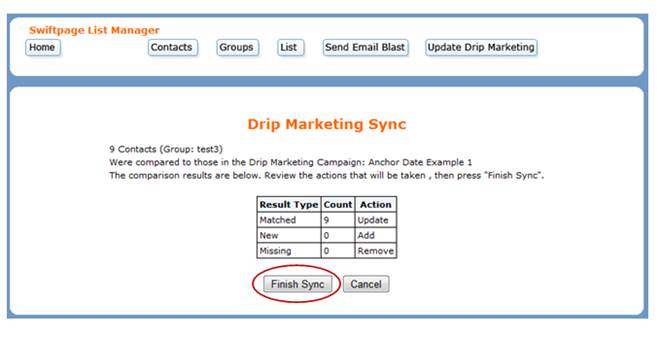
- The Swiftpage emarketing List Manager willconfirm that your contacts have been updated.